
Here’s how you can create a custom admin menu in Magento 2:
Step 1: Create a Magento 2 Module
You want to create a custom module to define your custom admin menu. You can use the following command to create a brand-new module:
php bin/magento module:create Explore_MenuStep 2: Define Your Admin Menu
In your custom module, navigate to Explore_Menu and so Explore/Menu/etc/adminhtml/menu.xml and define your admin menu there. Here’s an instance of how you may shape the menu.Xml report:
<?xml model="1.0"?>
<config xmlns:xsi="http://www.W3.Org/2001/XMLSchema-instance" xsi:noNamespaceSchemaLocation="urn:magento:module:Magento_Backend:and so on/menu.Xsd">
    <menu>
        <add id="Explore_Menu::first_level" title="Custom Extensions" module="Explore_Menu" sortOrder="10" resourse="Magento_Backend::content" />
        <add id="Explore_Menu::secound_level" title="Banners" module="Explore_Menu" sortOrder="0"
        parent="Explore_Menu::first_level" resourse="Magento_Backend::content" />
    </menu>
</config>
identity: Unique identifier to your menu.
Title: The label of your custom menu.
Module: Your module’s call.
SortOrder: The position of your menu item relative to others.
Parent: This attribute specifies the parent menu item under which your second-level menu item should be nested. In your example, it’s set to “Explore_Menu::first_level,” which means it’s a child of another menu item named “first_level” within your module’s menu.
Resource: The resource attribute defines the permission or ACL resource associated with this menu item. In your example, it’s set to “Magento_Backend::content.” This means that users must have the “Magento_Backend::content” ACL resource to access this menu item.
Step 3: Create Controller and Action
You need to create the controller and movement noted in the menu.xml file. Create the corresponding documents to your module’s Controller listing.
Step 4: Register Your Module
Register your module in Magento by jogging:
php bin/magento setup:upgradeStep five: Clear Cache
Clear the cache to make your changes visible:
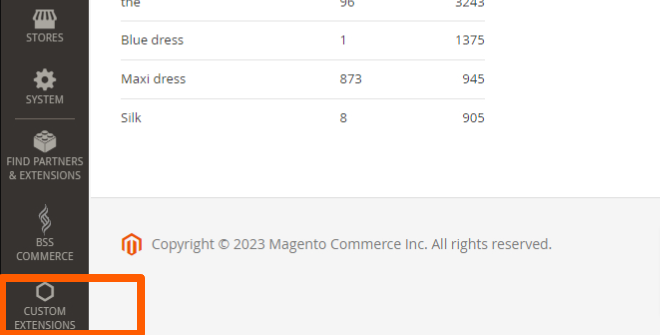
php bin/magento cache:flushNow, you should see your custom admin menu inside the Magento 2 admin panel below the specified determined menu.

Remember to replace Your_Module_Name, Your_Module::custom_menu, Custom Menu, and the action together with your real module
call, menu identifier, identify, and controller action.
Once you have completed these steps, you’ll have correctly created a custodm admin menu in Magento 2. Users with the
appropriate permissions will be able to get right of entry to the menu and have interaction with the associated controller movements.
Frequently Asked Questions
What is How to create custom menu in magento 2 admin?
How to create custom menu in magento 2 admin is an important web development topic. This guide explains the concept in a beginner-friendly way with practical notes and examples.
Why should beginners learn How to create custom menu in magento 2 admin?
Beginners should learn this topic because it improves their understanding of coding fundamentals, project structure, debugging, and real-world development workflows.
How can I practice How to create custom menu in magento 2 admin?
The best way to practice is to read the concept, write small examples, test the output, debug mistakes, and apply the topic inside a real project.